1 SYSTEM REQUIREMENT - Back to top
At the basic level, this theme will require the following conditions:
- Compatible with Magento Community Edition 1.9.x (require: php 5.4 and Memory_limit no less than 256Mb)
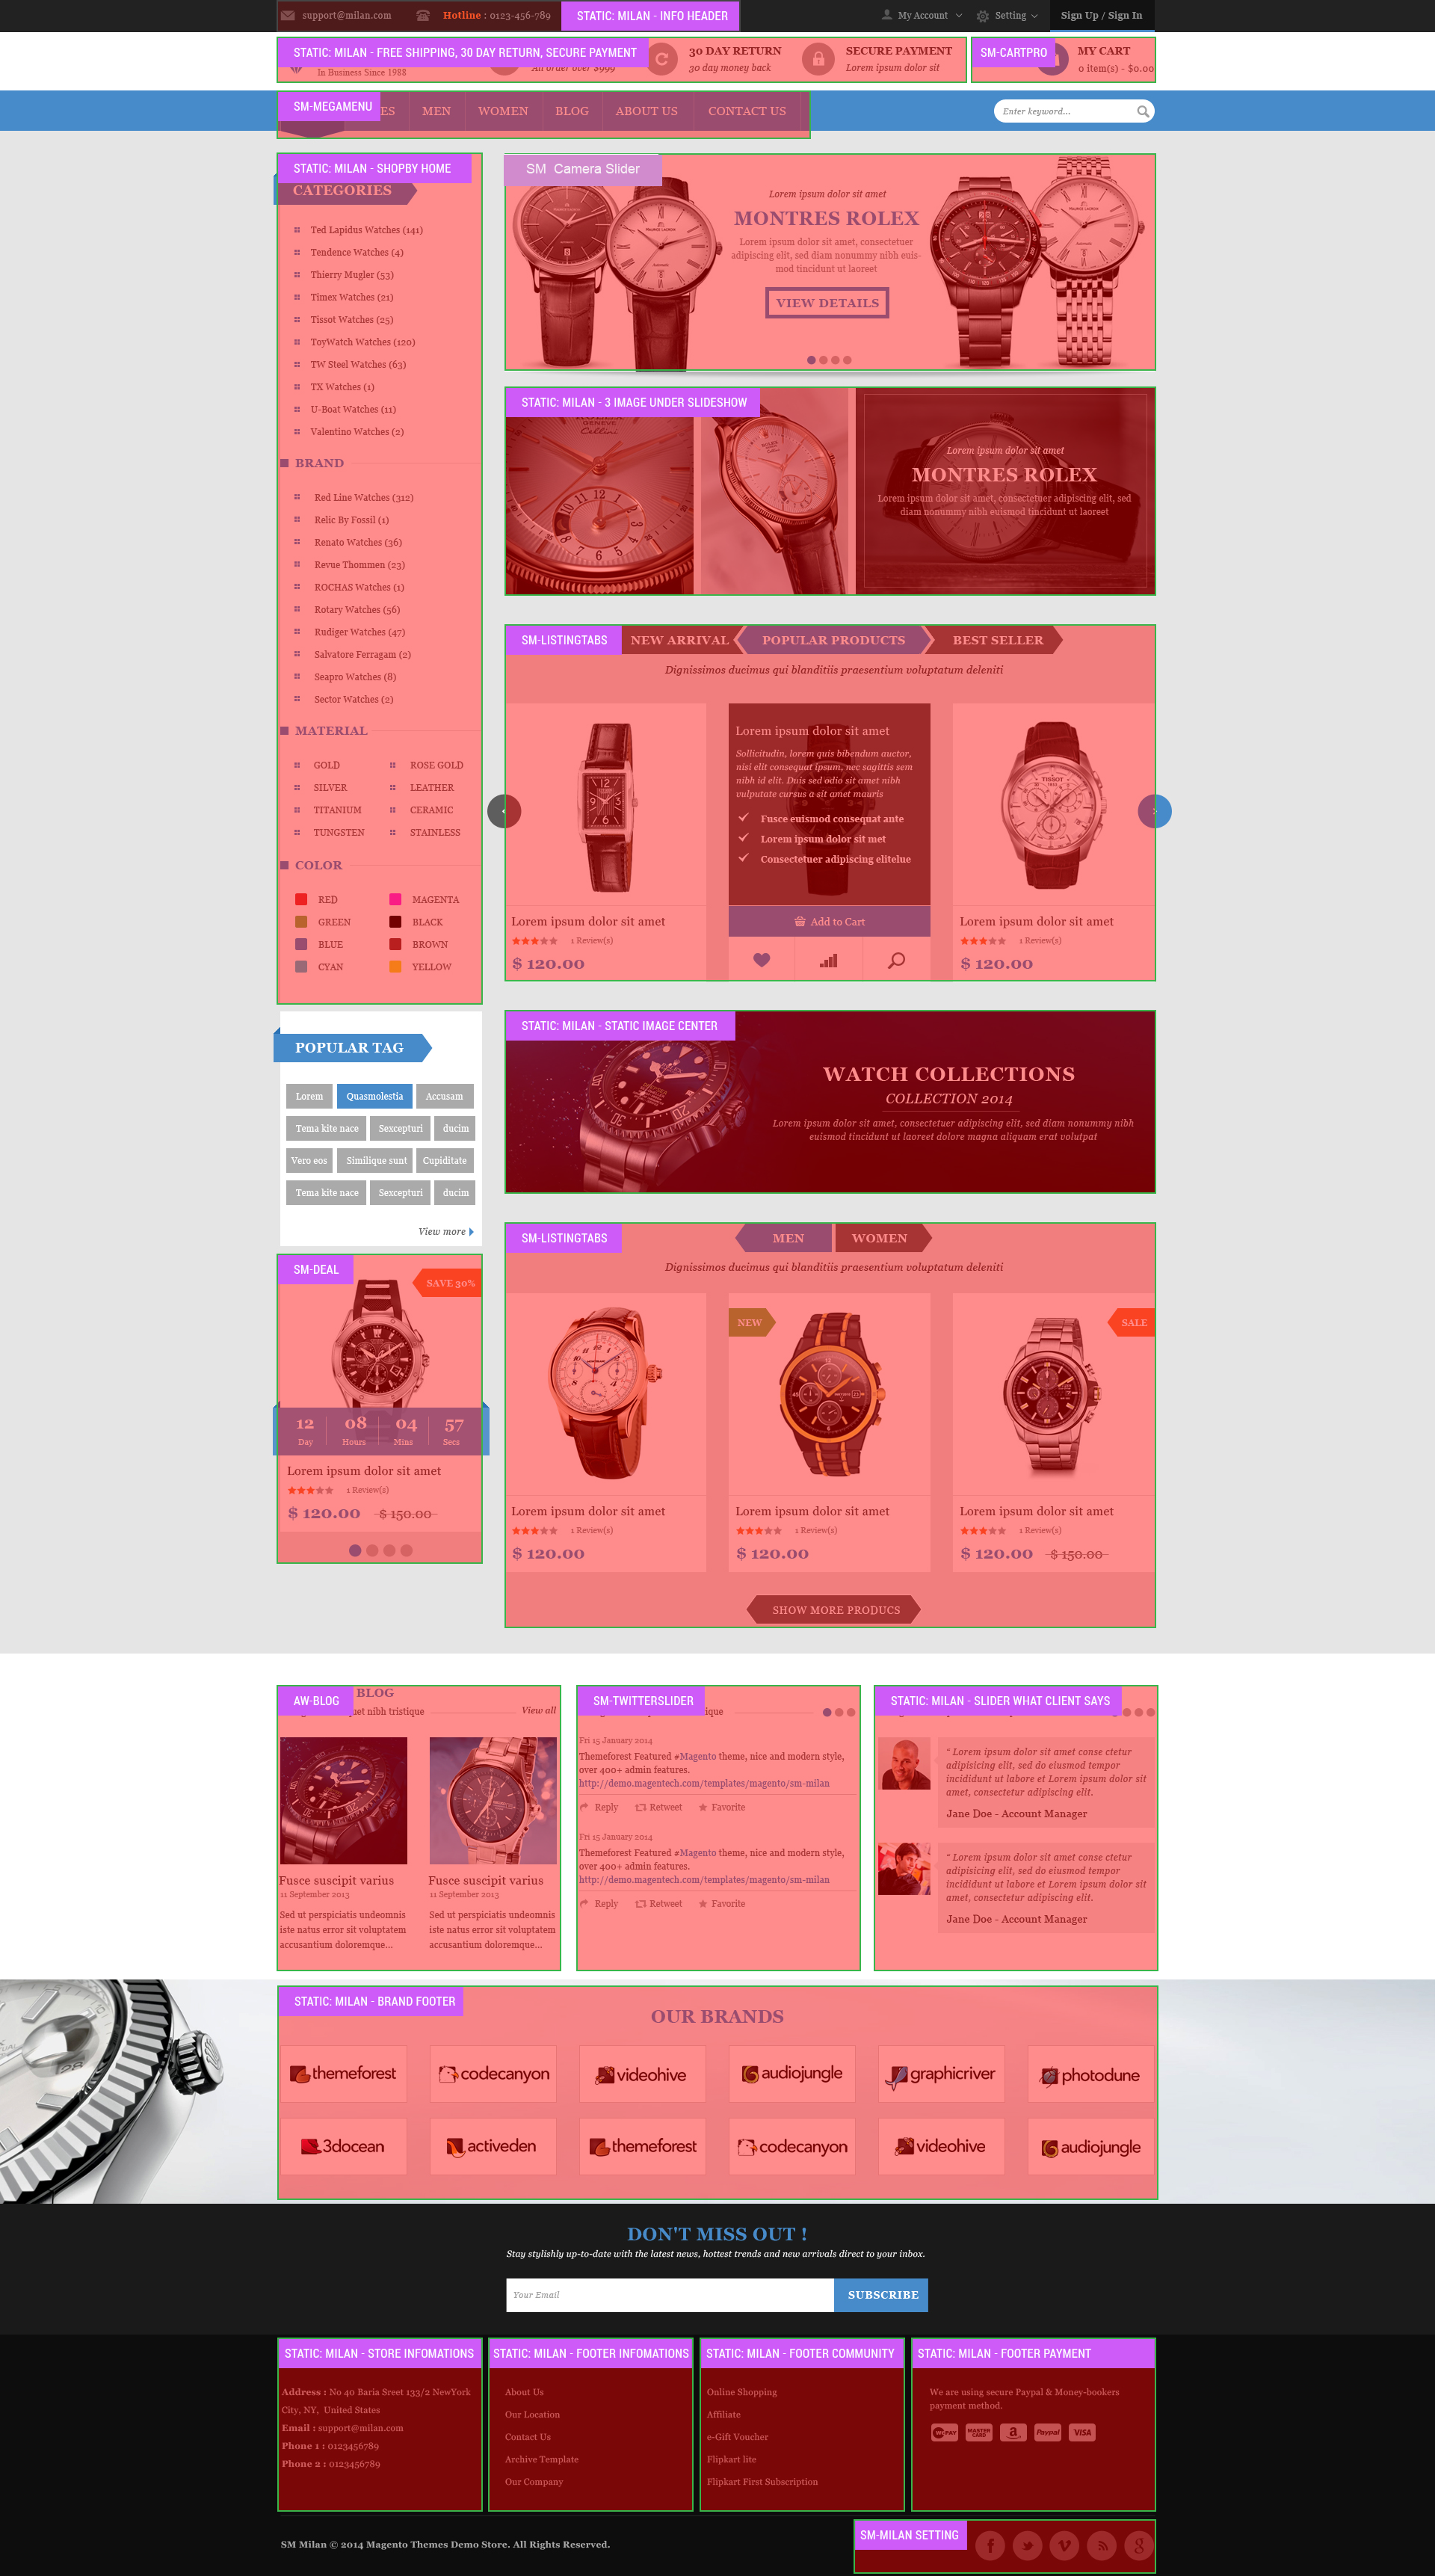
2LAYOUT POSITION - Back to top
3INSTALLATION - Back to top
There are two ways to install a Magento Theme:
- Quickstart Installation: By using this package, you will set the theme exactly as our Demo with sample data.
- Manual Installation (include of Theme Installation and Extension Installation): You will need only be using the zipped files in “Extensions” and “Theme” folders.
3.1 Quickstart Installation :
Magentech provides SM Quickstart package for each theme which aims to ease the installation for users. It will help you save much time of installing and configuring if you plan to start your site from the beginning. Please following steps below:
- Step 1: Download the quickstart package
- Step 2: Extract and Upload the whole Quickstart package to your server. In Quickstart folder you will see the extracted folder that include all sample data
- Step 3: Create a Database for your Magento

- Step 4: Start installation by opening browser and navigate to your URL (where the Quickstart uploaded) to load default Magento installer. Please follow each step of the Installer so that the installation process can be set.
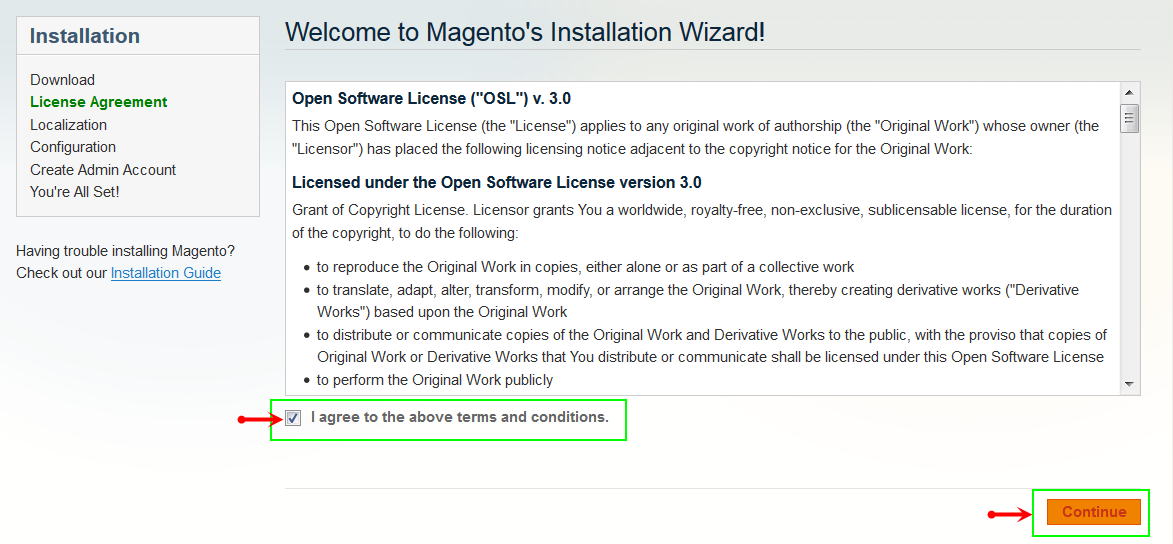
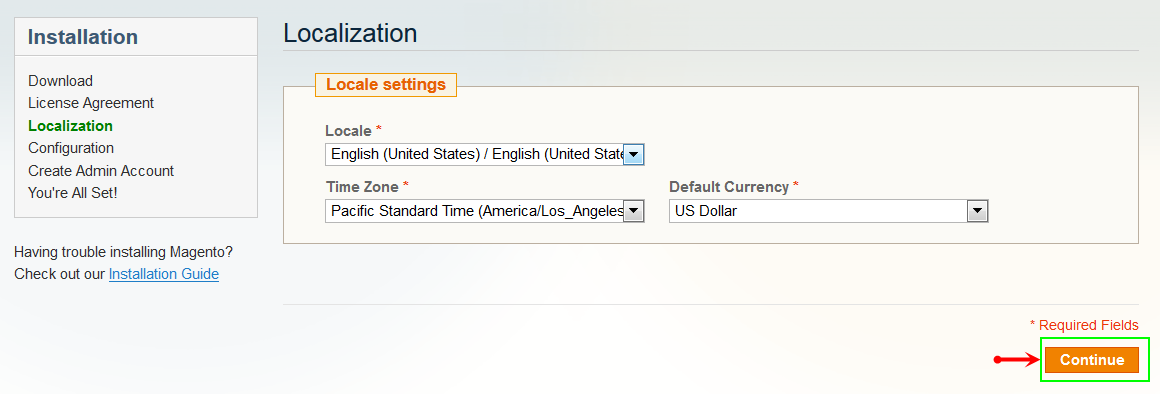
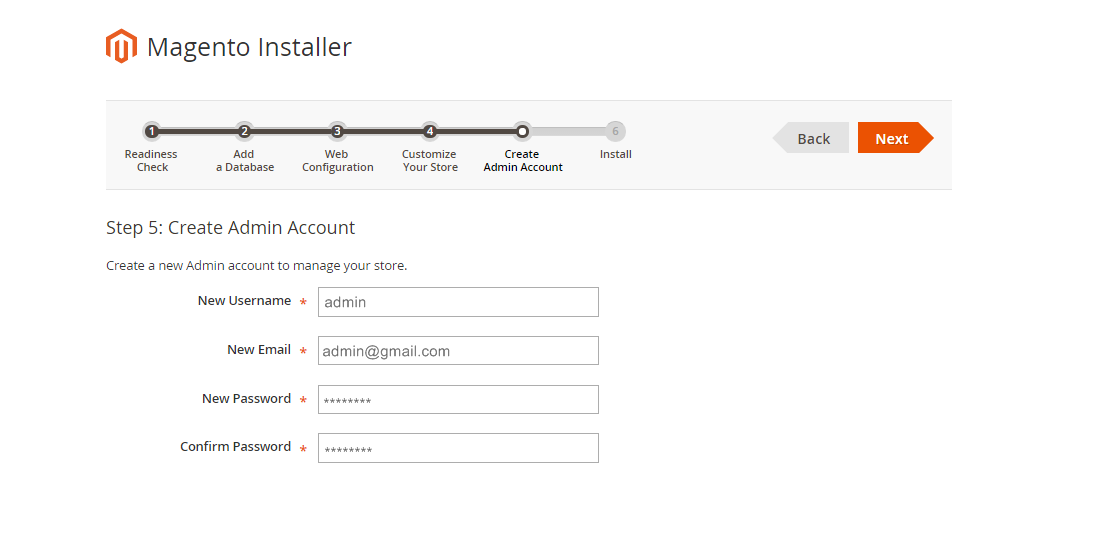
- Step 5: Locale Settings. Please fill fully into Required Fields (“Locale; Time Zone and Default Currency”.)
-
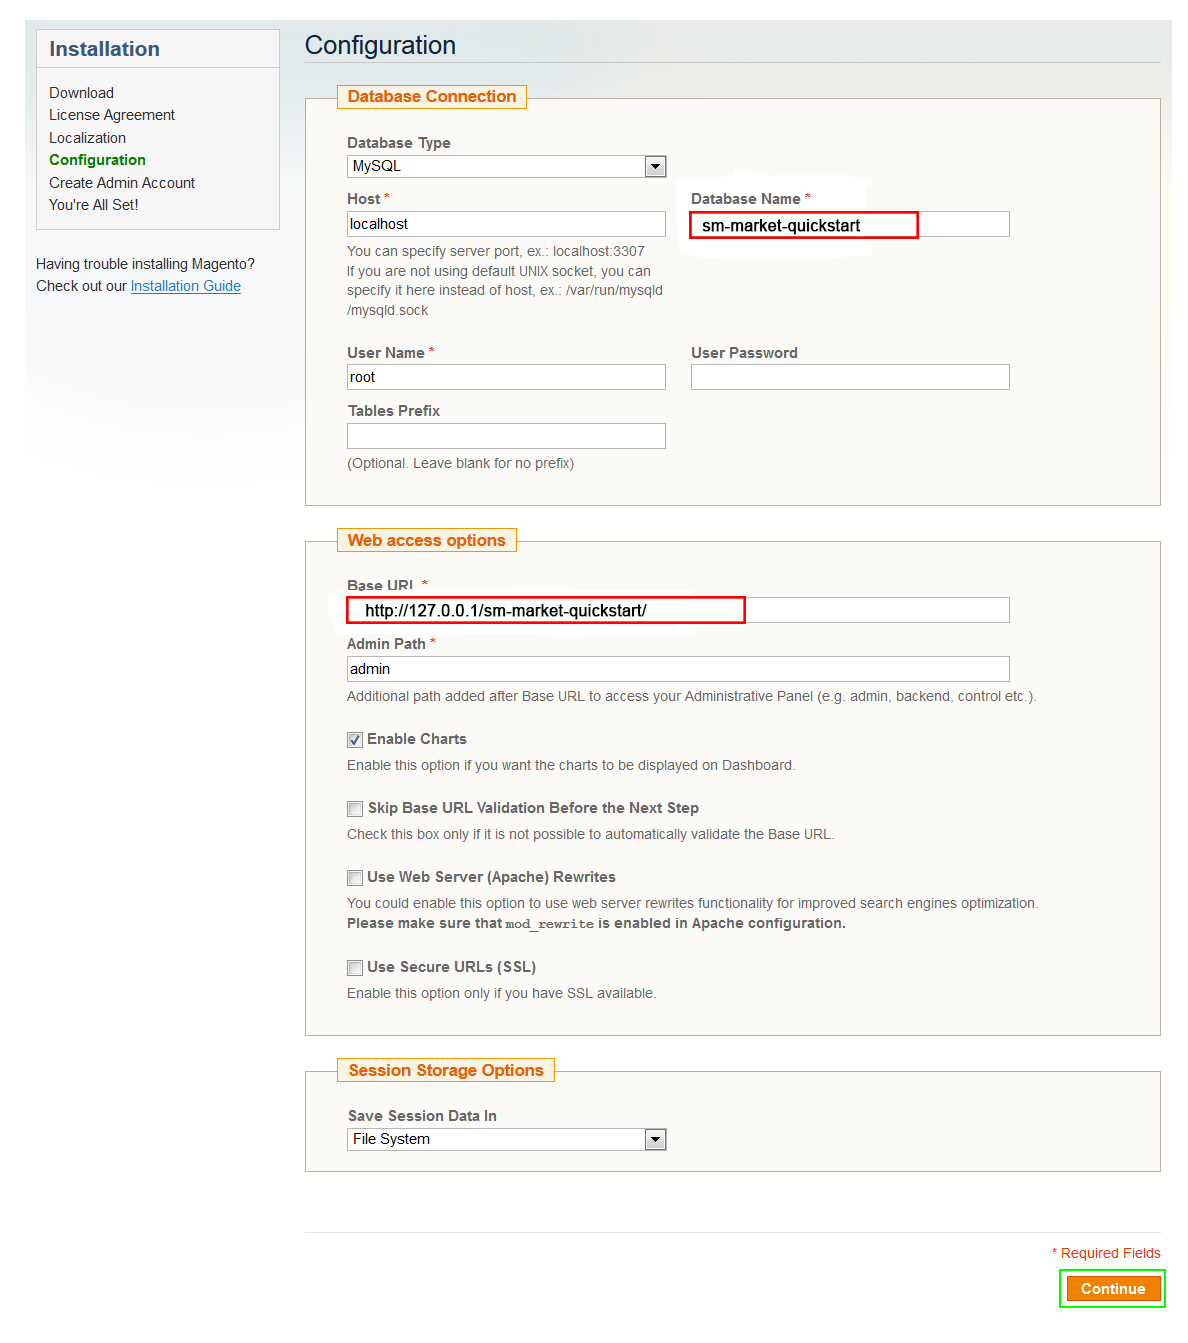
Step 6: In the Configuration step, input the required fields as below.
- Do not use “localhost” in URL, otherwise you could not log in to your Admin area (you should use your local IP in case of installing on your computer).
- Leave Tables prefix field blank.
- Step 7: Create Admin Account. Please fill fully into Required Fields (“First Name; Last Name; Email; Username; password and confirm password”.)
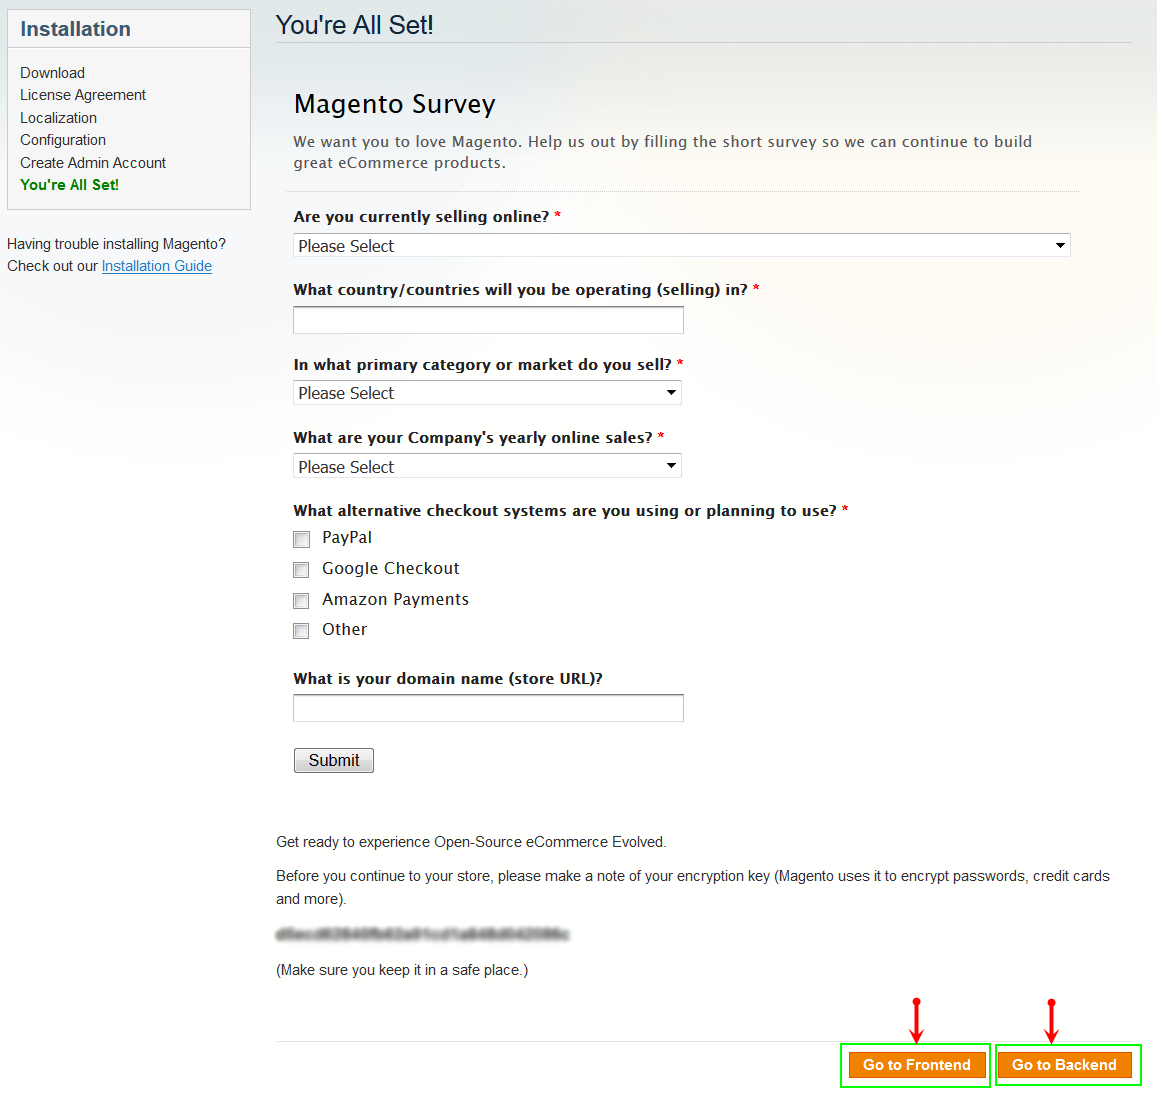
- Step 8: Finish Installation and now you can Go to Frontend or Go to Backend.
3.2 Manual Installation
3.2.1 Theme Installation
Please install Magento extension Theme in advance of any other installations to avoid unexpected conflicts that may occur.
-
Step 1: Copy folders skin and app to your site root folder. The overwritten folders should have a directory layout like this:
{docroot} /magento/
app/
index.php
js/
lib/
LICENSE.txt
media/
pear/
skin/
var/ - Step 2: Log in to your Admin Panel (e.g. Access Magento Admin area: https://yourdomain/index.php/admin/). Log out and log in back.
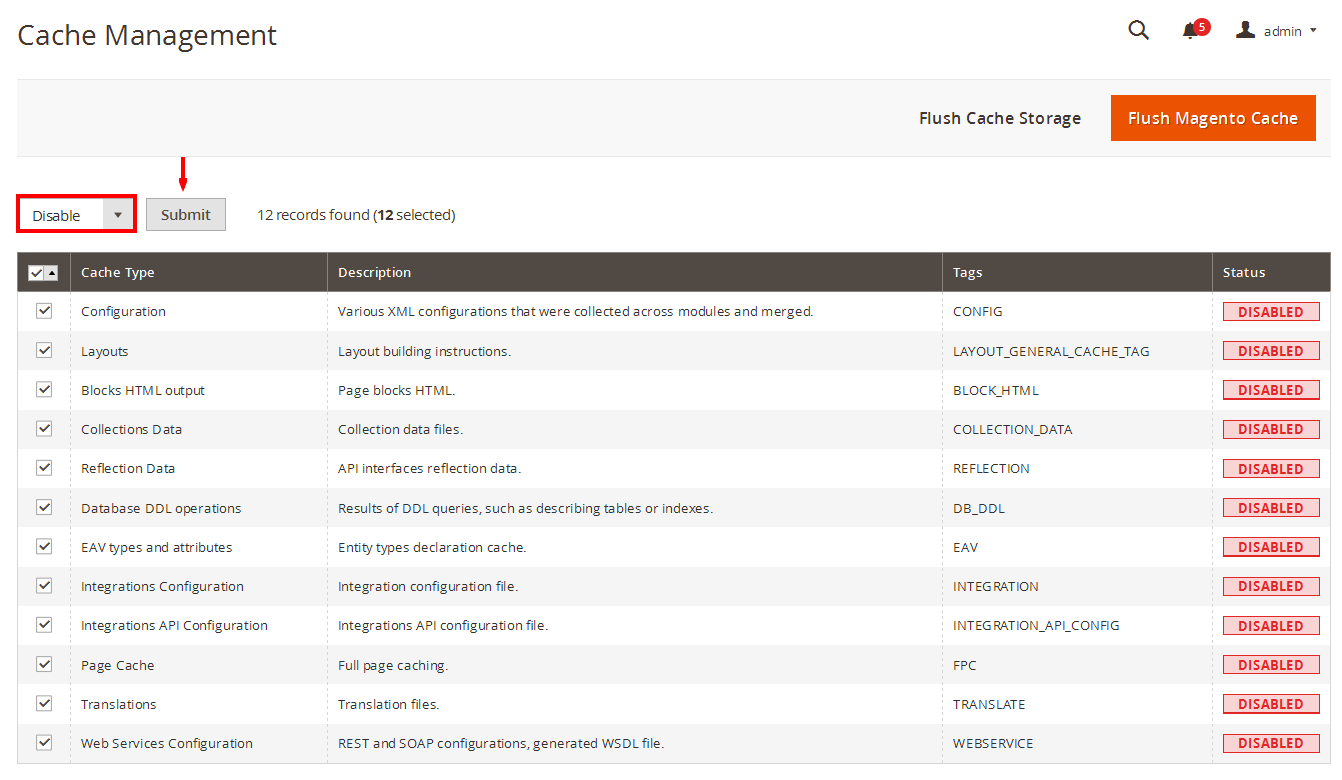
- Step 3: Navigate to System >> Cache Management, Sellect All the cache types, take Action as Refresh and Submit.
- Step 4: Navigate to System >> Configuration >> Design.
- Step 5: In Package tab, input Default field with the actual theme name.
- Step 6: You can also change the settings for Header .
- Step 7: Click Save Config button to finish..
3.2.2 Extension Installation
- Step 1: Copy all the folders of each extension folder that you have extracted to the your site root folder.
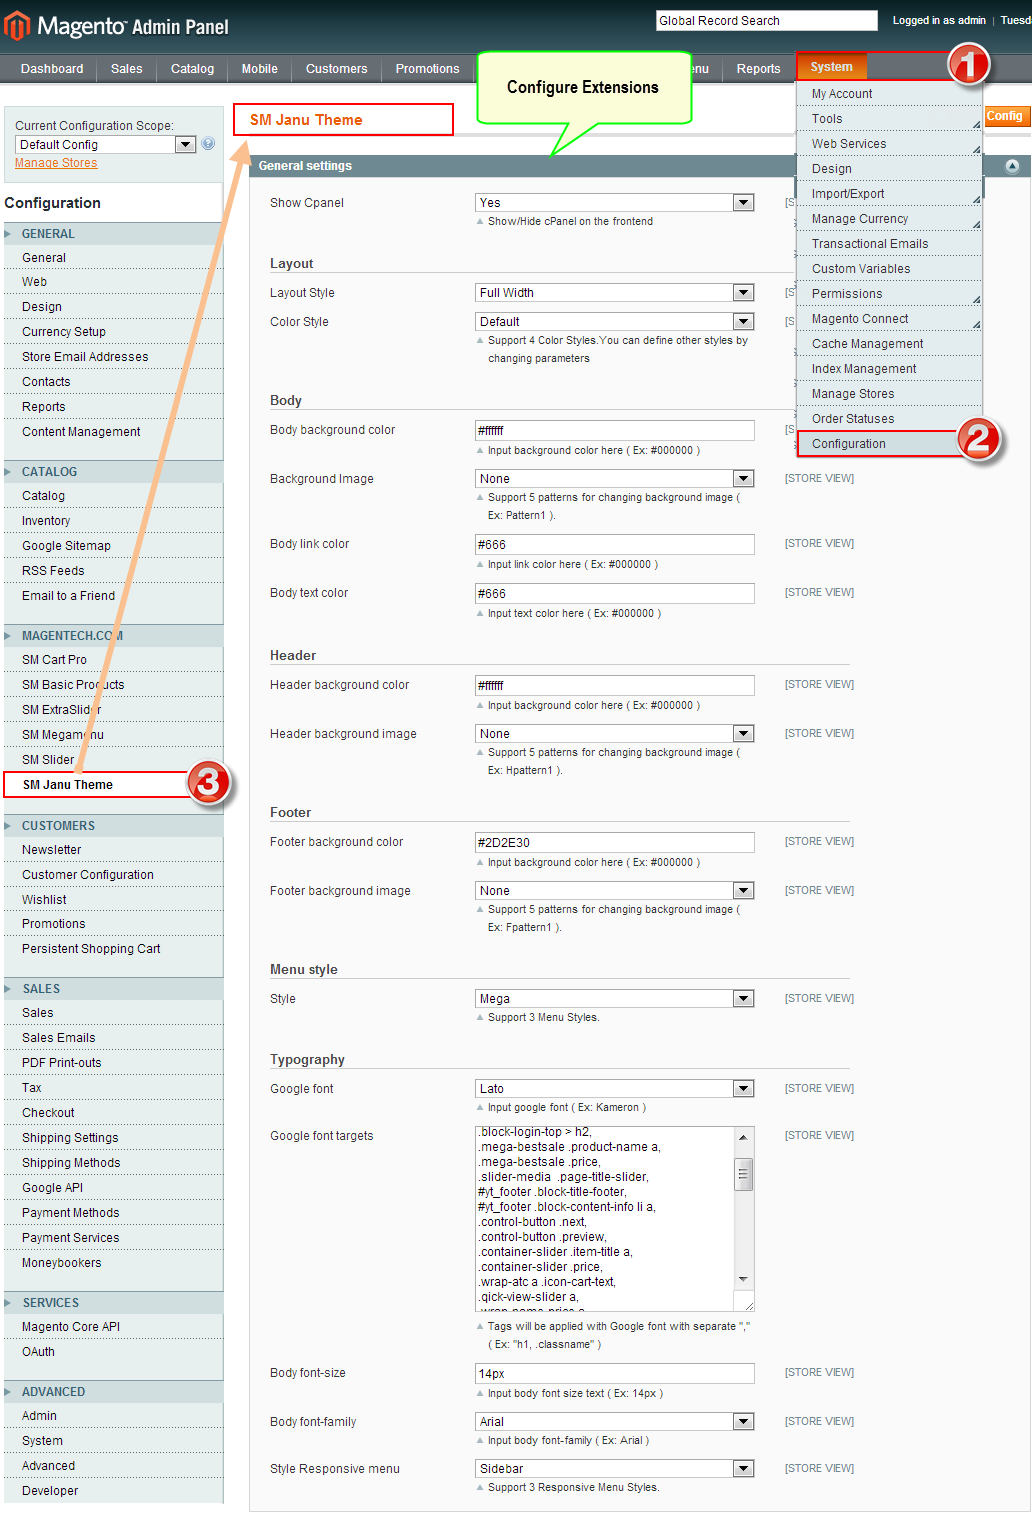
- Step 2: In your Admin Panel, navigate to System >> Configuration >> Extensions Configuration (on the left-hand menu).
- Step 3: You will see installed extension, click extension’s name tab to go to extension configuration page as the image below:
4CONFIGURATION - Back to top
4.1 Page Configuration
4.1.1 Homepage Default
Detailed layout of Homepage Default:
To configure this page, in the Admin Panel, navigate to CMS >> Pages. Create a new page in Page Management section.
- Page Information Tab: Please click to see the Backend Settings.
- Design Tab: Please click to see the Backend Settings.
Copy and paste the following code into the Design field:
|
1
2
3
4
5
6
7
8
9
10
11
12
13
14
15
16
17
18
19
20
21
22
23
24
25
26
27
28
29
30
31
32
33
34
35
36
37
38
39
40
41
42
43
44
45
46
47
48
49
50
51
52
53
54
55
56
57
58
59
60
61
|
<reference name="left">
<block type="megamenu/list" name="megamenu.list.theme" as="megaMenuLeftHome" template="sm/megamenu/megamenu_left_content.phtml">
<action method="setConfig">
<values>
<group_id>7</group_id>
<theme>2</theme>
<title>Categories</title>
</values>
</action>
</block>
<block type="cms/block" name="block-shopby-home">
<action method="setBlockId"><block_id>shopby-home</block_id></action>
</block>
<block type="facebook/list" name="facebook.list.default" template="sm/facebook/default.phtml" after="block-shopby-home">
</block>
<block type="tag/popular" after="facebook.list.default" name="tags_popular" template="tag/popular.phtml"/>
<block type="cms/block" name="static-image-left">
<action method="setBlockId"><block_id>static-image-left</block_id></action>
</block>
</reference>
<reference name="dynamic-slideshow">
<block type="sm_cameraslide/slide_preview" name="sm_cameraslide" as="cameraslide" ></block>
</reference>
<reference name="content">
<block type="cms/block" name="block-static-image-3">
<action method="setBlockId"><block_id>image-static-under-slideshow</block_id></action>
</block>
<block type="deal/List" name="deal" as="deal" template="sm/deal/default_home.phtml"></block>
<block type="cms/block" name="block-static-image-1">
<action method="setBlockId"><block_id>static-image-center</block_id></action>
</block>
<block type="listingtabs/list" name="listingtabs.list.default" as="listingtabs.list.default" template="sm/listingtabs/default.phtml"/>
</reference>
<reference name="bottom_block_home">
<block type="blog/blog" name="latest-blog" template="aw_blog/latest-blog.phtml"></block>
<block type="basicproducts/list" name="basicproducts.list.default" template="sm/basicproducts/basic-home.phtml">
<action method="_setConfig">
<values>
<basicproducts_title_text>recommend products</basicproducts_title_text>
<pretext>Ut dignissim aliquet nibh tristique</pretext>
<product_limitation>9</product_limitation>
<product_addcart_display>1</product_addcart_display>
</values>
</action>
</block>
<block type="cms/block" name="block-client-say">
<action method="setBlockId"><block_id>slider-client-say</block_id></action>
</block>
</reference>
|
4.1.2 Layout Homepage2
Detailed layout of Homepage2:
To configure this page, in the Admin Panel, navigate to CMS >> Pages. Create a new page in Page Management section.
- Page Information Tab: Please click to see the Backend Settings.
- Design Tab: Please click to see the Backend Settings .
Copy and paste the following code into the Design field:
|
1
2
3
4
5
6
7
8
9
10
11
12
13
14
15
16
17
18
19
20
21
22
23
24
25
26
27
28
29
30
31
32
33
34
35
36
37
|
<reference name="dynamic-slideshow">
<block type="sm_cameraslide/slide_preview" name="sm_cameraslide" as="cameraslide" ></block>
</reference>
<reference name="content">
<block type="cms/block" name="block-static-image-3">
<action method="setBlockId"><block_id>static-image-home-v1</block_id></action>
</block>
<block type="listingtabs/list" name="listingtabs_slider" as="listingtabs_slider" template="sm/listingtabs/default_slider_v2.phtml"/>
<block type="cms/block" name="block-static-image-1">
<action method="setBlockId"><block_id>static-image-bottom</block_id></action>
</block>
<block type="deal/List" name="deal" as="deal" template="sm/deal/default_home_v2.phtml"></block>
</reference>
<reference name="bottom_block_home">
<block type="blog/blog" name="latest-blog" template="aw_blog/latest-blog.phtml"></block>
<block type="basicproducts/list" name="basicproducts.list.default" template="sm/basicproducts/basic-home.phtml">
<action method="_setConfig">
<values>
<basicproducts_title_text>recommend products</basicproducts_title_text>
<pretext>Ut dignissim aliquet nibh tristique</pretext>
<product_limitation>9</product_limitation>
<product_addcart_display>1</product_addcart_display>
</values>
</action>
</block>
<block type="cms/block" name="block-client-say">
<action method="setBlockId"><block_id>slider-client-say</block_id></action>
</block>
</reference>
|
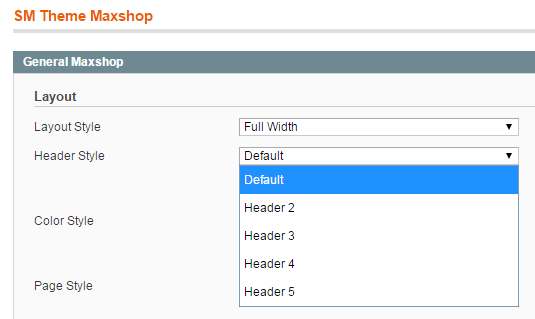
4.2 Configure Header & Change Header Style
SM Market support 4 Header Styles: “Header default“, “Header 2“, “Header 3” and “Header 4“. In the Admin Panel, please navigate to SM Milan Settings >> in General Settings tab, find Header Style Parameter and select Header Style that you want to display.
After “Save config” above, please visit: \app\design\frontend\default\sm_milan\template\page\html\ to edit some code.
e.g:
you want change “Header 2” style:
+
In Admin you select Header Style: “Header 2″
+
And then go to “app\design\frontend\default\sm_milan\template\page\html\header2.phtml” >> and find “<?php
if( Mage::getSingleton(‘cms/page’)->getIdentifier() == ‘home-v2′ && Mage::app()->getFrontController()->getRequest()->getRouteName() == ‘cms’ ) { /* if is home page*/?>” and change ‘home-v2‘ ==> ‘current identifier of your CMS Home page’.
4.3 Mega Menu Configuration
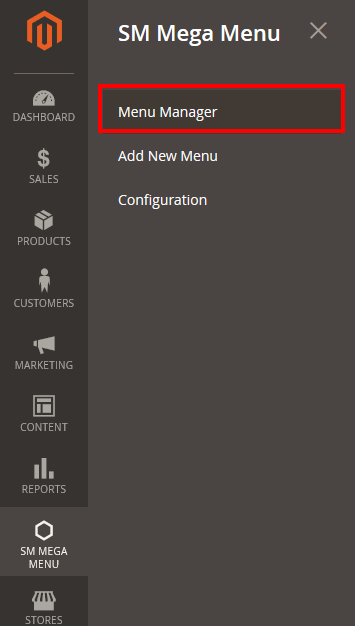
SM Zana Fashion supports Magento extension Mega Menu. Follow the guide below to get it configured properly. In the Magento Admin Panel, navigate to SM Mega Menu >> Menu Manager.
- Firstly, click “Add Group” button to add 2 groups with named: Root Catalog - have id “5″ and Vertical_Menu - have id “6″.
- Secondly, navigate to SM Mega Menu >> Configuration
- Thirdly, go to Menu Items Manager >> click Add Menu Item button to create the Menu Items.
HOME MENU
Frontend Appearance
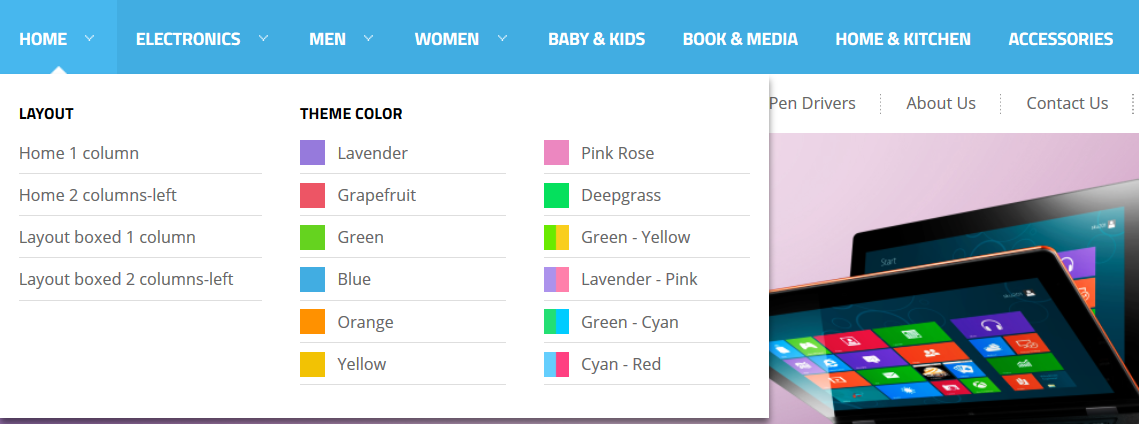
- Item: “Home” Item — Menu Backend Settings
Copy and paste the following code into the Content field:
|
1
2
3
4
5
6
7
8
9
10
11
12
13
14
15
16
17
18
19
20
21
22
23
24
25
26
27
28
29
30
31
32
33
34
35
36
37
38
39
|
<div class="home-item-wrapper">
<div class="colum-home home-layout">
<h2>Layout Styles</h2>
<ul class="list-item-home">
<li><a title="Home Default" href="{{store url="?___store=english&___from_store=italia"}}">Home Default</a></li>
<li><a title="Home Style 1" href="{{store url="?___store=italia&___from_store=english"}}">Home Style 1</a></li>
<li><a title="Home Style 2" href="{{store url="?___store=bolivia&___from_store=english"}}">Home Style 2</a></li>
<li><a title="Boxed Layout" href="{{store url="?___store=spain&___from_store=english"}}">Boxed Layout</a></li>
<li><a title="Right To Left" href="{{store url="?___store=chile&___from_store=english"}}">Right To Left</a></li>
</ul>
</div>
<div class="colum-home header-style">
<h2>Header Styles</h2>
<ul class="list-item-home">
<li><a title="Header Style Default" href="{{store url="?___store=english&___from_store=italia"}}">Header Style Default</a></li>
<li><a title="Header Style 1" href="{{store url="?___store=french&___from_store=english"}}">Header Style 1</a></li>
<li><a title="Header Style 2" href="{{store url="?___store=japan&___from_store=english"}}">Header Style 2</a></li>
<li><a title="Header Style 3" href="{{store url="?___store=brazil&___from_store=english"}}">Header Style 3</a></li>
<li><a title="Header Style 4" href="{{store url="?___store=argentina&___from_store=english"}}">Header Style 4</a></li>
</ul>
</div>
<div class="colum-home color-style">
<h2>Color Styles</h2>
<div class="content-color-style">
<ul class="list-item-home">
<li class="blue"><a title="Blue" href="{{store url="?___store=english&___from_store=italia"}}">Blue</a></li>
<li class="green"><a title="Green" href="{{store url="?___store=jamaica&___from_store=english"}}">Green</a></li>
<li class="cyan"><a title="Cyan" href="{{store url="?___store=cameroon&___from_store=english"}}">Cyan</a></li>
</ul>
<ul class="list-item-home">
<li class="red"><a title="Red" href="{{store url="?___store=hungary&___from_store=english"}}">Red</a></li>
<li class="orange"><a title="Orange" href="{{store url="?___store=sweden&___from_store=english"}}">Orange</a></li>
<li class="avocado"><a title="Avocado" href="{{store url="?___store=vietnam&___from_store=english"}}">Avocado</a></li>
</ul>
</div>
</div>
</div>
|
MEN MENU
Frontend Appearance
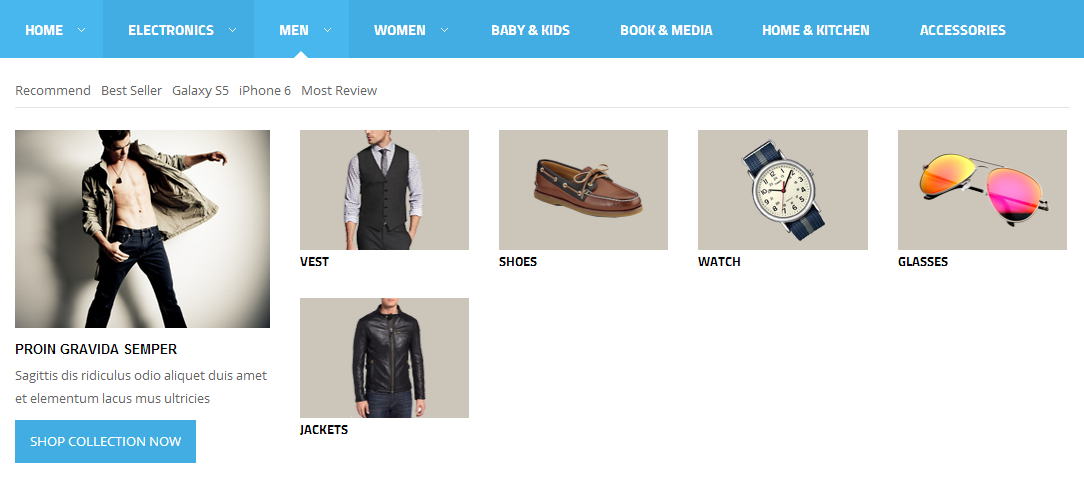
Tree of Men Menu:
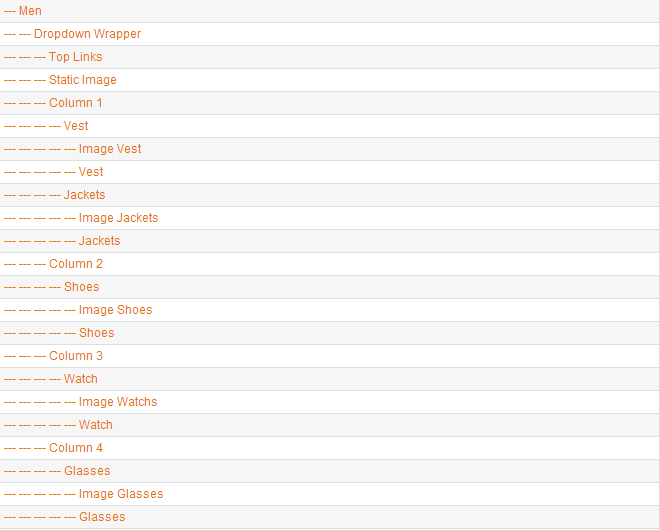
- Item: “Men” Item - Menu Backend Settings
- Item: “Dropdown” Item - Menu Backend Settings
- Item: “Casio Category” Item - Menu Backend Settings
- Item: “Casio Image” Item - Menu Backend Settings
Copy and paste the following code into the Content field at “Casio Image” Item:
|
1
|
<div class="image-category-menu"><a title="Casio" href="#"><img src="{{media url="wysiwyg/image-megamenu/casio-image.png"}}" alt="Casio" /></a></div>
|
- Item: “Casio” Item - Menu Backend Settings
- Item: “Versace” Item - Menu Backend Settings
Note: Other menu items (“SEIKO; CITIZEN & TISSOT”) have the same settings with the items above.
- Item: “Static Image” Item — Menu Backend Settings
Copy and paste the following code into the Content field:
|
1
|
<div class="static-img-block"><a title="Static Image" href="#"><img alt="Static Image" src="{{media url="wysiwyg/men-st-image.png"}}" /></a></div>
|
WOMEN MENU
Frontend Appearance

Tree of Women Menu:
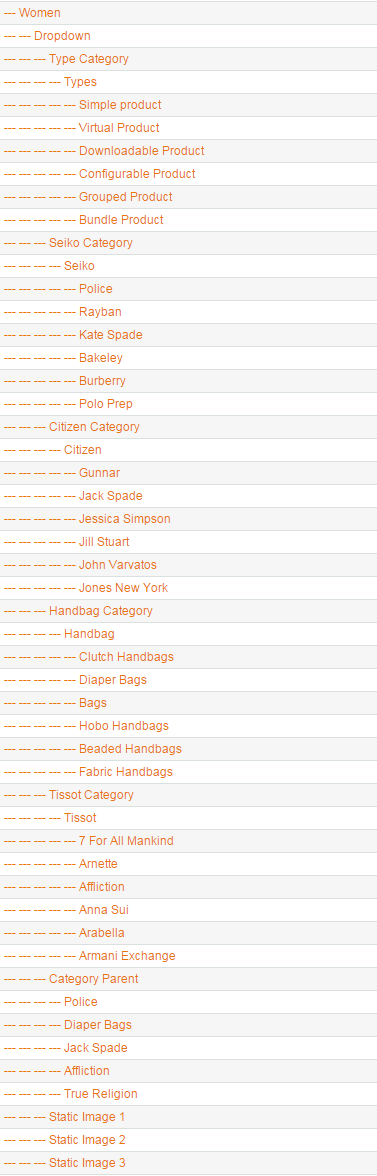
- Item: “Women” Item- Menu Backend Settings
- Item: “Dropdown” Item- Menu Backend Settings
- Item: “Type Category” Item- Menu Backend Settings
- Item: “Types” Item- Menu Backend Settings
- Item: “Simple product” Item- Menu Backend Settings
Note: Other menu items (“SEIKO; CITIZEN; HANDBAG & TISSOT”) have the same settings with the items above.
- Item: “Category Parent” Item- Menu Backend Settings
- Item: “Police” Item- Menu Backend Settings
- Item: “Static Image 1″ Item- Menu Backend Settings
Copy and paste the following code into the Content field:
|
1
|
<div class="image-category-menu image-bottom"><a title="Static Image" href="#"><img src="{{media url="wysiwyg/image-megamenu/image-dropdown-1.png"}}" alt="Static Image" /></a></div>
|
- Item: “Static Image 2- Menu Backend Settings
Copy and paste the following code into the Content field:
|
1
|
<div class="image-category-menu image-bottom"><a title="Static Image" href="#"><img src="{{media url="wysiwyg/image-megamenu/image-dropdown-2.png"}}" alt="Static Image" /></a></div>
|
- Item: “Static Image 3″ Item- Menu Backend Settings
Copy and paste the following code into the Content field:
|
1
|
<div class="image-category-menu image-bottom"><a title="Static Image" href="#"><img src="{{media url="wysiwyg/image-megamenu/image-dropdown-3.png"}}" alt="Static Image" /></a></div>
|
4.4 Configure Extensions
List of Extensions are used in SM Milan Theme:
- SM Cart Pro Module : Click Here to view tutorial
- SM Listing Tab Module
- SM Twitter Slider : Click Here to view tutorial
- SM Deal Module : Click Here to view tutorial
- SM QuickView : Click Here to view tutorial
- SM Shopby
- SM Milan Setting
- SM Mega Menu: Click Here to view tutorial
- SM Camera Slider : Click Here to view tutorial
I. SM Cart Pro Module
- Position: SM Cart Pro
- Frontend Appearance

- Backend of SM Cart Pro: Click Here
II. SM Camera Slider
- Position: SM Camera Slider
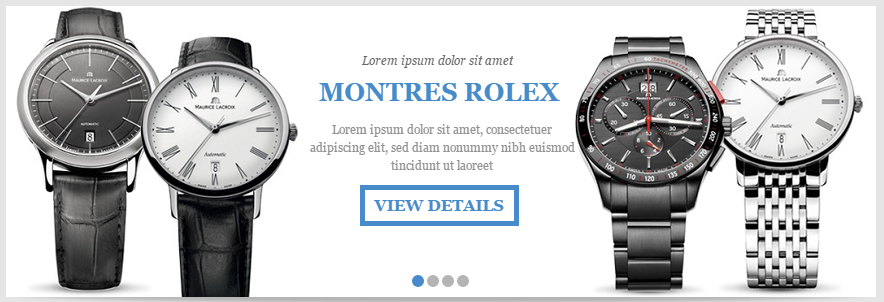
- Frontend Appearance:
- Backend Settings:
-
In the Administrator Panel page, go to SM Camera Slide >> Manage Sliders to add New Slide or Edit Slide
- General Options of ‘Slideshow Default’ : Click here
- Sliders of ‘Slideshow Default’: You could see the backend settings of Slide 1 as following and do the same with other slides. Click here
- In the Administrator Panel page, go to SM Camera Slide >> Settings to configure this module: Click here
- To view more guide about how to install, set up and configure SM Camera Slider as you want, please click here
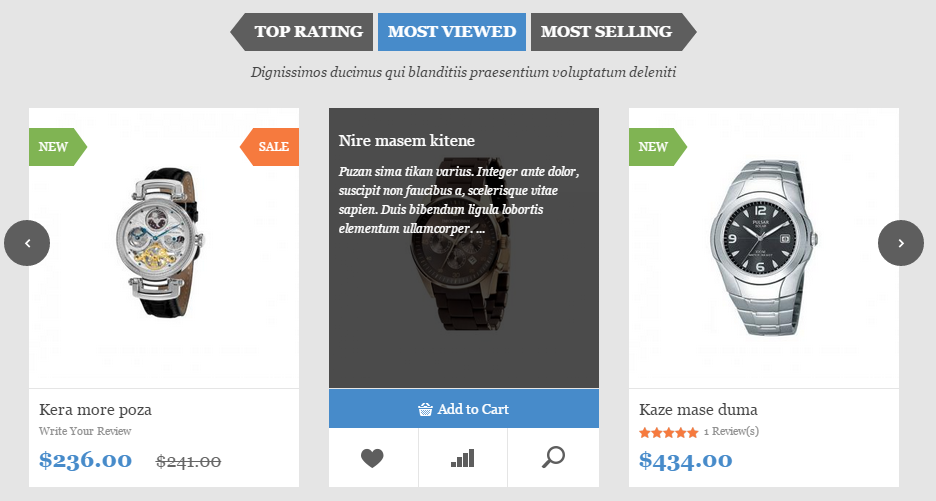
III. SM Listing Tabs
- Position: SM Listing Tabs
- Frontend Appearance
- Backend of SM SM Listing Tabs: Click Here
- To config this position, please navigate to CMS >> Pages >> Home page, navigate to Design tab and paste code as below:
|
1
2
3
4
5
6
7
8
9
10
11
12
13
|
<reference name="content">
<block type="listingtabs/list" name="listingtabs_slider" as="listingtabs_slider" template="sm/listingtabs/default_slider.phtml">
<action method="_setConfig">
<values>
<filter_type>fieldproducts</filter_type>
<filter_order_by>best_sales,most_viewed,top_rating</filter_order_by>
<field_preload>most_viewed</field_preload>
<product_limitation>12</product_limitation>
<product_order_dir>ASC</product_order_dir>
</values>
</action>
</block>
</reference>
|
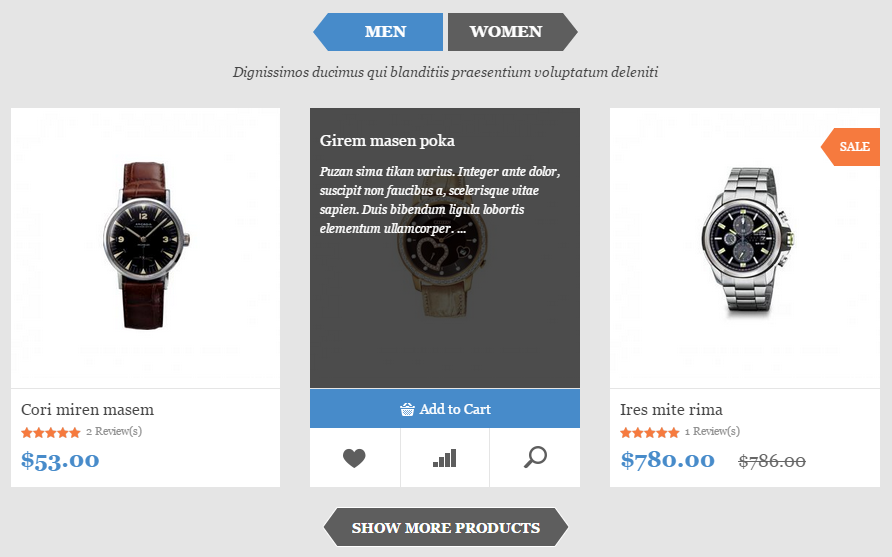
IV. SM Listing Tabs
- Position: SM Listing Tabs
- Frontend Appearance
To config this position, please navigate to CMS >> Pages >> Home page, navigate to Design tab and paste code as below:
|
1
2
3
|
<reference name="content">
<block type="listingtabs/list" name="listingtabs.list.default" as="listingtabs.list.default" template="sm/listingtabs/default.phtml"/>
</reference>
|
V. SM Twitter Slider
- Position: SM Twitter Slider
- Frontend Appearance:

- Backend of SM Twitter Slider: Click Here
Note: Please go Here to view more How To Get Consumer Key and Consumer Secret on Twitter.
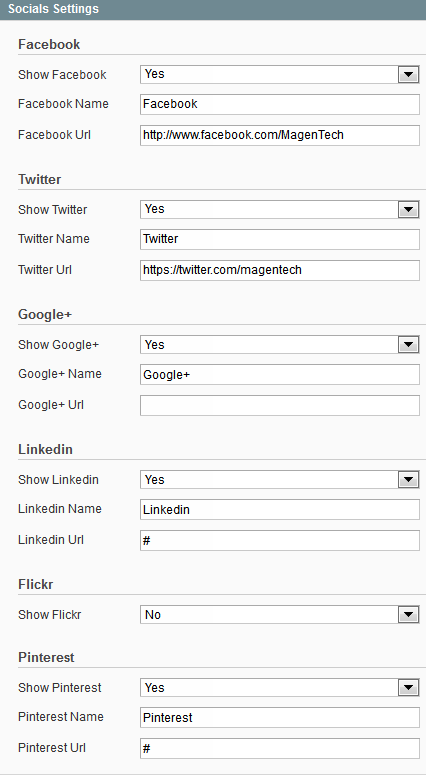
VI. SM Milan Setting
- Position: SM Milan Setting
- Frontend Appearance:
To configure backend of SM Milan Setting, in your admin panel go to SM Milan Setting >> find go “Socials style” tab to configure as image below.
4.5 Configure blocks
The SM Milan has static blocks in the Theme:
- Milan - Info Header
- Milan - Free Shipping
- Milan - 30 day return
- Milan - Secure Payment
- Milan - Shopby Home
- Milan - 3 Image Under Slideshow
- Milan - Slider What Client Says
- Milan - Brand Footer
- Milan - Store Informations
- Milan - Footer Infomations
- Milan - Footer Community
- Milan - Footer Payment
To create static blocks, go to CMS >> Static Blocks >> Add new block
Milan - Info Header
- Frontend Appearance

- Link show Backend of Milan - Info Header.
- Content Code of Milan - Info Header:
Milan - Free Shipping
- Frontend Appearance

- Link show Backend of Milan - Free Shipping.
- Content Code of Milan - Free Shipping:
|
1
2
3
4
5
6
7
8
9
10
11
|
<div class="service-top">
<div class="icon-sv free_shipping"><a title="Free Shipping" href="#"><span>Free Shipping</span></a></div>
<div class="info-sv">
<h2><a title="Free Shipping" href="#">Free Shipping</a></h2>
<p>All orders over $999</p>
</div>
<div class="tooltip-sv">
<div class="head-tooltip">Free shipping on all orders over $999</div>
<div class="content-tooltip">Kiren mason poka. Integer ante dolor, suscipit non faucibus a, scelerisque vitae sapien. Duis bibendum ligula lobortis elementum ullamcorper. Aliquam pellentesque pretium ipsum, quis auctor arcu. Fusce dictum bus felis.</div>
</div>
</div>
|
Milan - 30 day return
- Frontend Appearance

- Link show Backend of Milan - 30 day return.
- Content Code of Milan - 30 day return:
|
1
2
3
4
5
6
7
8
9
10
11
12
13
14
15
16
17
18
19
|
<div class="service-top">
<div class="icon-sv return-day"><a title="30 days return" href="#"><span>30 days return</span></a></div>
<div class="info-sv">
<h2><a title="30 days return" href="#">30 days return</a></h2>
<p>30 days money back</p>
</div>
<div class="tooltip-sv">
<div class="head-tooltip">All purchases at Shop are covered for 30 days</div>
<div class="content-tooltip">
<ul class="list-tooltip">
<li>Fusce euismod consequat ante</li>
<li>Lorem ipsum dolor sit met</li>
<li>Consectetuer adipiscing elitelue</li>
<li>Fusce euismod consequat ante</li>
<li>Fusce euismod consequat ante</li>
</ul>
</div>
</div>
</div>
|
Milan - Secure Payment
- Frontend Appearance

- Link show Backend of Milan - Secure Payment.
- Content Code of Milan - Secure Payment:
|
1
2
3
4
5
6
7
8
9
10
11
12
13
14
15
16
17
18
|
<div class="service-top">
<div class="icon-sv secure_payment"><a title="Secure Payment" href="#"><span>Secure Payment</span></a></div>
<div class="info-sv">
<h2><a title="Secure Payment" href="#">Secure Payment</a></h2>
<p>Lorem ipsum dolor sit</p>
</div>
<div class="tooltip-sv">
<div class="head-tooltip">Lorem ipsum dolor sit</div>
<div class="content-tooltip">
<p>Kiren mason poka. Integer ante dolor, suscipit non faucibus a, scelerisque vitae sapien. Duis bibendum ligula lobortis elementum ullamcor</p>
<ul class="list-payment">
<li><a title="Payment" href="#"><img src="{{media url="wysiwyg/payment/paypal.png"}}" alt="Payment" /></a></li>
<li><a title="Payment" href="#"><img src="{{media url="wysiwyg/payment/visa.png"}}" alt="Payment" /></a></li>
<li><a title="Payment" href="#"><img src="{{media url="wysiwyg/payment/electron.png"}}" alt="Payment" /></a></li>
</ul>
</div>
</div>
</div>
|
Milan - Shopby Home
- Frontend Appearance
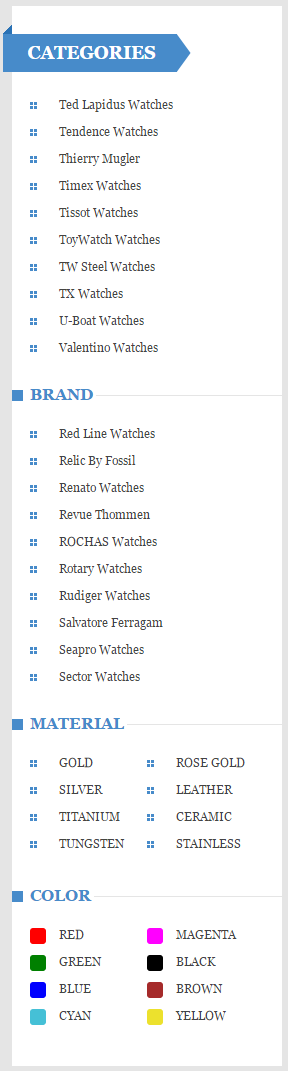
- Link show Backend of Milan - Shopby Home.
- Content Code of Milan - Shopby Home:
|
1
2
3
4
5
6
7
8
9
10
11
12
13
14
15
16
17
18
19
20
21
22
23
24
25
26
27
28
29
30
31
32
33
34
35
36
37
38
39
40
41
42
43
44
45
46
47
48
49
50
51
|
<div class="block block-layered-nav shopby-home">
<div class="block-title"><strong> <span>Categories</span> </strong></div>
<div class="block-content">
<div id="narrow-by-list">
<div class="filter-wrapp"><dl><dd><ol>
<li><a title="Ted Lapidus Watches" href="{{store url=''}}men/ted-lapidus-watches.html">Ted Lapidus Watches</a></li>
<li><a title="Tendence Watches" href="{{store url=''}}men/tendence-watches.html">Tendence Watches</a></li>
<li><a title="Thierry Mugler" href="{{store url=''}}men/thierry-mugler.html">Thierry Mugler</a></li>
<li><a title="Timex Watches" href="{{store url=''}}men/timex-watches.html">Timex Watches</a></li>
<li><a title="Tissot Watches" href="{{store url=''}}men/tissot-watches.html">Tissot Watches</a></li>
<li><a title="ToyWatch Watches" href="{{store url=''}}men/toywatch-watches.html">ToyWatch Watches</a></li>
<li><a title="TW Steel Watches" href="{{store url=''}}men/tw-steel-watches.html">TW Steel Watches</a></li>
<li><a title="TX Watches" href="{{store url=''}}men/tx-watches.html">TX Watches</a></li>
<li><a title="U-Boat Watches" href="{{store url=''}}men/u-boat-watches.html">U-Boat Watches</a></li>
<li><a title="Valentino Watches" href="{{store url=''}}men/valentino-watches.html">Valentino Watches</a></li>
</ol></dd></dl></div>
<div class="filter-wrapp"><dl><dt><span>Brand</span></dt><dd><ol>
<li><a title="Red Line Watches" href="{{store url=''}}catalogsearch/advanced/result/?manufacturer[]=28">Red Line Watches</a></li>
<li><a title="Relic By Fossil" href="{{store url=''}}catalogsearch/advanced/result/?manufacturer[]=117">Relic By Fossil</a></li>
<li><a title="Renato Watches" href="{{store url=''}}catalogsearch/advanced/result/?manufacturer[]=102">Renato Watches</a></li>
<li><a title="Revue Thommen" href="{{store url=''}}catalogsearch/advanced/result/?manufacturer[]=29">Revue Thommen</a></li>
<li><a title="ROCHAS Watches" href="{{store url=''}}catalogsearch/advanced/result/?manufacturer[]=32">ROCHAS Watches</a></li>
<li><a title="Rotary Watches" href="{{store url=''}}catalogsearch/advanced/result/?manufacturer[]=64">Rotary Watches</a></li>
<li><a title="Rudiger Watches" href="{{store url=''}}catalogsearch/advanced/result/?manufacturer[]=101">Rudiger Watches</a></li>
<li><a title="Salvatore Ferragam" href="{{store url=''}}catalogsearch/advanced/result/?manufacturer[]=34">Salvatore Ferragam</a></li>
<li><a title="Seapro Watches" href="{{store url=''}}catalogsearch/advanced/result/?manufacturer[]=111">Seapro Watches</a></li>
<li><a title="Sector Watches" href="{{store url=''}}catalogsearch/advanced/result/?manufacturer[]=135">Sector Watches</a></li>
</ol></dd></dl></div>
<div class="filter-wrapp Material"><dl><dt><span>Material</span></dt><dd><ol>
<li><a title="GOLD" href="{{store url=''}}catalogsearch/advanced/result/?material[]=134">GOLD</a></li>
<li><a title="ROSE GOLD" href="{{store url=''}}catalogsearch/advanced/result/?material[]=130">ROSE GOLD</a></li>
<li><a title="SILVER" href="{{store url=''}}catalogsearch/advanced/result/?material[]=133">SILVER</a></li>
<li><a title="LEATHER" href="{{store url=''}}catalogsearch/advanced/result/?material[]=129">LEATHER</a></li>
<li><a title="TITANIUM" href="{{store url=''}}catalogsearch/advanced/result/?material[]=132">TITANIUM</a></li>
<li><a title="CERAMIC" href="{{store url=''}}catalogsearch/advanced/result/?material[]=128">CERAMIC</a></li>
<li><a title="TUNGSTEN" href="{{store url=''}}catalogsearch/advanced/result/?material[]=131">TUNGSTEN</a></li>
<li><a title="STAINLESS" href="{{store url=''}}catalogsearch/advanced/result/?material[]=127">STAINLESS</a></li>
</ol></dd></dl></div>
<div class="filter-wrapp Color"><dl><dt><span>Color</span></dt><dd><ol>
<li class="Red"><a title="RED" href="{{store url=''}}catalogsearch/advanced/result/?color[]=26">RED</a></li>
<li class="Magenta"><a title="MAGENTA" href="{{store url=''}}catalogsearch/advanced/result/?color[]=58">MAGENTA</a></li>
<li class="Green"><a title="GREEN" href="{{store url=''}}catalogsearch/advanced/result/?color[]=22">GREEN</a></li>
<li class="Black"><a title="BLACK" href="{{store url=''}}catalogsearch/advanced/result/?color[]=24">BLACK</a></li>
<li class="Blue"><a title="BLUE" href="{{store url=''}}catalogsearch/advanced/result/?color[]=25">BLUE</a></li>
<li class="Brown"><a title="BROWN" href="{{store url=''}}catalogsearch/advanced/result/?color[]=59">BROWN</a></li>
<li class="Cyan"><a title="CYAN" href="{{store url=''}}catalogsearch/advanced/result/?color[]=137">CYAN</a></li>
<li class="Yellow"><a title="YELLOW" href="{{store url=''}}catalogsearch/advanced/result/?color[]=136">YELLOW</a></li>
</ol></dd></dl></div>
</div>
</div>
</div>
|
Milan - 3 Image Under Slideshow
- Frontend Appearance

- Link show Backend of Milan - 3 Image Under Slideshow.
- Content Code of Milan - 3 Image Under Slideshow:
|
1
2
3
4
5
6
7
|
<div class="static-image-block three-image">
<ul class="image-list">
<li><a title="Static Image" href="#"><img src="{{media url="wysiwyg/static-image-home/static-image-1.png"}}" alt="Static Image" /></a></li>
<li><a title="Static Image" href="#"><img src="{{media url="wysiwyg/static-image-home/static-image-2.png"}}" alt="Static Image" /></a></li>
<li><a title="Static Image" href="#"><img src="{{media url="wysiwyg/static-image-home/static-image-3.png"}}" alt="Static Image" /></a></li>
</ul>
</div>
|
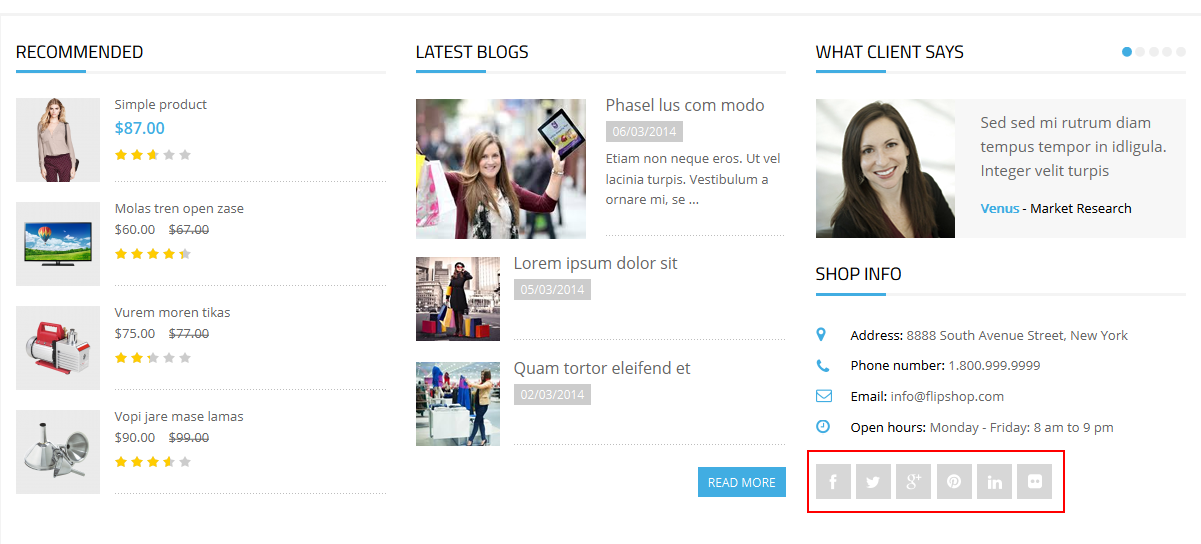
Milan - Slider What Client Says
- Frontend Appearance

- Link show Backend of Milan - Slider What Client Says.
- Content Code of Milan - Slider What Client Says:
|
1
2
3
4
5
6
7
8
9
10
11
12
13
14
15
16
17
18
19
20
21
22
23
24
25
26
27
28
29
30
31
32
33
34
35
36
37
38
39
40
41
42
43
44
45
46
47
48
49
50
51
52
53
54
55
56
57
58
59
60
61
62
63
64
65
66
67
68
69
70
71
72
73
74
75
|
<div class="testimonials col-lg-4 col-md-4">
<div class="bottom-title">
<h2 class="bt-title">What Client Says</h2>
</div>
<div class="des-home-block with-bg">
<p class="des-ct">Ut dignissim aliquet nibh tristique</p>
</div>
<div class="slider-testimonials">
<div class="item">
<div class="item-client">
<div class="image-client"><a class="image-p" title="Venus - Market Research" href="#"> <img src="{{media url="wysiwyg/img-client-1.png"}}" alt="Venus - Market Research" /></a></div>
<div class="description">
<p class="des-ct-client">"Lorem ipsum dolor sit amet conse ctetur adipisicing elit, sed do eiusmod tempor incididunt ut labore et Lorem ipsum dolor sit amet, consectetur adipiscing elit.</p>
<div class="info-client"><a title="Jane Doe - Account Manager" href="#">Jane Doe - Account Manager</a></div>
</div>
</div>
</div>
</div>
<script type="text/javascript">// <![CDATA[
jQuery(document).ready(function($) {
$('.slider-testimonials').owlCarousel({
navigation : false, // Show next and prev buttons
afterInit : function(elem){
var that = this
that.owlControls.prependTo(elem)
},
slideSpeed : 300,
stopOnHover: true,
paginationSpeed : 400,
autoPlay:false,
pagination: true,
singleItem:true
});
});
// ]]></script>
</div>
|
Milan - Brand Footer
- Frontend Appearance

- Link show Backend of Milan - Brand Footer.
- Content Code of Milan - Brand Footer:
|
1
2
3
4
5
6
7
8
9
10
11
12
13
14
15
16
17
18
19
20
21
22
23
24
25
26
27
|
<div class="footer-brand">
<div class="container">
<div class="row">
<div class="col-lg-12 col-md-12">
<div class="brand-list">
<div class="title-block">
<h2>OUR BRANDS</h2>
</div>
<ul class="row list-brand">
<li class="col-lg-2 col-md-2 col-sm-2"><a title="Brand Logo" href="#"><img src="{{media url="wysiwyg/brand-footer/brand-1.png"}}" alt="Brand Logo" /></a></li>
<li class="col-lg-2 col-md-2 col-sm-2"><a title="Brand Logo" href="#"><img src="{{media url="wysiwyg/brand-footer/brand-2.png"}}" alt="Brand Logo" /></a></li>
<li class="col-lg-2 col-md-2 col-sm-2"><a title="Brand Logo" href="#"><img src="{{media url="wysiwyg/brand-footer/brand-3.png"}}" alt="Brand Logo" /></a></li>
<li class="col-lg-2 col-md-2 col-sm-2"><a title="Brand Logo" href="#"><img src="{{media url="wysiwyg/brand-footer/brand-4.png"}}" alt="Brand Logo" /></a></li>
<li class="col-lg-2 col-md-2 col-sm-2"><a title="Brand Logo" href="#"><img src="{{media url="wysiwyg/brand-footer/brand-5.png"}}" alt="Brand Logo" /></a></li>
<li class="col-lg-2 col-md-2 col-sm-2"><a title="Brand Logo" href="#"><img src="{{media url="wysiwyg/brand-footer/brand-6.png"}}" alt="Brand Logo" /></a></li>
<li class="col-lg-2 col-md-2 col-sm-2"><a title="Brand Logo" href="#"><img src="{{media url="wysiwyg/brand-footer/brand-7.png"}}" alt="Brand Logo" /></a></li>
<li class="col-lg-2 col-md-2 col-sm-2"><a title="Brand Logo" href="#"><img src="{{media url="wysiwyg/brand-footer/brand-8.png"}}" alt="Brand Logo" /></a></li>
<li class="col-lg-2 col-md-2 col-sm-2"><a title="Brand Logo" href="#"><img src="{{media url="wysiwyg/brand-footer/brand-9.png"}}" alt="Brand Logo" /></a></li>
<li class="col-lg-2 col-md-2 col-sm-2"><a title="Brand Logo" href="#"><img src="{{media url="wysiwyg/brand-footer/brand-10.png"}}" alt="Brand Logo" /></a></li>
<li class="col-lg-2 col-md-2 col-sm-2"><a title="Brand Logo" href="#"><img src="{{media url="wysiwyg/brand-footer/brand-11.png"}}" alt="Brand Logo" /></a></li>
<li class="col-lg-2 col-md-2 col-sm-2"><a title="Brand Logo" href="#"><img src="{{media url="wysiwyg/brand-footer/brand-12.png"}}" alt="Brand Logo" /></a></li>
</ul>
</div>
</div>
</div>
</div>
</div>
|
Milan - Store Informations
- Frontend Appearance
- Link show Backend of Milan - Store Informations.
- Content Code of Milan - Store Informations:
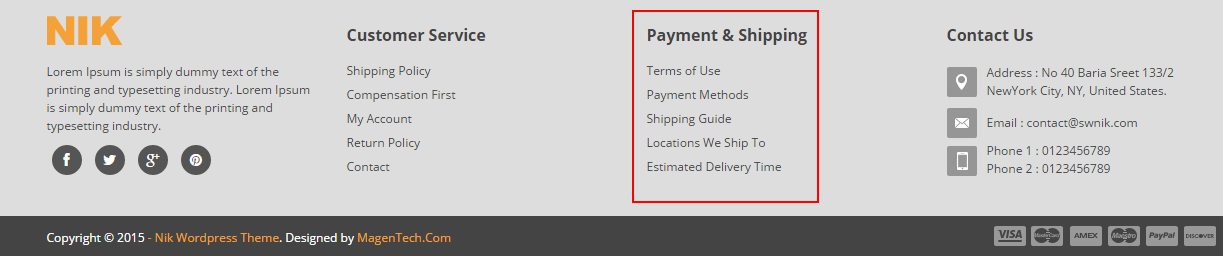
Milan - Footer Infomations
- Frontend Appearance

- Link show Backend of Milan - Footer Infomations.
- Content Code of Milan - Footer Infomations:
|
1
2
3
4
5
6
7
8
9
10
11
12
13
14
|
<div class="block-footer">
<div class="footer-title">
<h2>Information</h2>
</div>
<div class="footer-content">
<ul class="footer-link">
<li><a title="About Us" href="#">About Us</a></li>
<li><a title="Our Location" href="#">Our Location</a></li>
<li><a title="Contact Us" href="#">Contact Us</a></li>
<li><a title="Archive Template" href="#">Archive Template</a></li>
<li><a title="Our Company" href="#">Our Company</a></li>
</ul>
</div>
</div>
|
Milan - Footer Community
- Frontend Appearance

- Link show Backend of Milan - Footer Community.
- Content Code of Milan - Footer Community:
|
1
2
3
4
5
6
7
8
9
10
11
12
13
14
|
<div class="block-footer">
<div class="footer-title">
<h2>Community</h2>
</div>
<div class="footer-content">
<ul class="footer-link">
<li><a title="Online Shopping" href="#">Online Shopping</a></li>
<li><a title="Affiliate" href="#">Affiliate</a></li>
<li><a title="e-Gift Voucher" href="#">e-Gift Voucher</a></li>
<li><a title="Flipkart lite" href="#">Flipkart lite</a></li>
<li><a title="Flipkart First Subscription" href="#">Flipkart First Subscription</a></li>
</ul>
</div>
</div>
|
Milan - Footer Payment
- Frontend Appearance
- Link show Backend of Milan - Footer Payment.
- Content Code of Milan - Footer Payment:
|
1
2
3
4
5
6
7
8
9
10
11
12
13
14
15
|
<div class="block-footer">
<div class="footer-title">
<h2>Payment Method</h2>
</div>
<div class="footer-content">
<p class="paymen-des">We are using secure Paypal & Money-bookers payment method.</p>
<ul class="list-payment">
<li><img src="{{media url="wysiwyg/payment/paymen-1.png"}}" alt="Payment" /></li>
<li><img src="{{media url="wysiwyg/payment/paymen-2.png"}}" alt="Payment" /></li>
<li><img src="{{media url="wysiwyg/payment/paymen-3.png"}}" alt="Payment" /></li>
<li><img src="{{media url="wysiwyg/payment/paymen-4.png"}}" alt="Payment" /></li>
<li><img src="{{media url="wysiwyg/payment/paymen-5.png"}}" alt="Payment" /></li>
</ul>
</div>
</div>
|
5SUPPORT – Back to top
Thank you so much for purchasing this theme. If you have any questions that are beyond the scope of this help file, please send us via: Support Tickets System
Thanks so much!